Adding Filter text box to existing grid (MES), now a grid sizing question

I’m trying to learn how to put a text box above a grid to filter a grid in MES. The grid filtering works, but the feedback isn’t the best and I’m trying to make things easier for people that barely use computers. I would like to add some text boxes on top of the current work grid that uses a starts with condition to filter what is in the grid.

Looking through the customization guide, I don’t see the exact scenario walk through, but it looks to me like an EpiTextBox combined with rule from the rule wizard is the way to accomplish this. Am I on the right track here? Or is there a simpler way to do this?

it’s not gravy, but it’s not super complicated. In your initialize custom code block you’ll want to turn your grid filter on

	myGrid = (Ice.Lib.Framework.EpiUltraGrid)csm.GetNativeControlReference("09bbac04-0c14-449b-9f99-b66bbf58dd6e");
    myGrid.DisplayLayout.Override.AllowRowFiltering = DefaultableBoolean.True;

I used an on leave event on the text box (use some event of your choosing)

	private void strJobNum_Leave(object sender, System.EventArgs args)
	{
		// ** Argument Properties and Uses **
		// args.Row["FieldName"]
		// args.Column, args.ProposedValue, args.Row
		// Add Event Handler Code
		if (strJobNum.Text != "")
			{
				tpGrid.Rows.ColumnFilters.ClearAllFilters();
				strAssembly.Clear();
				strOperation.Clear();
				string strJob = strJobNum.Value.ToString();
				tpGrid.Rows.ColumnFilters["JobNum"].FilterConditions.Add( FilterComparisionOperator.Equals, strJob );
			}
		else
			{
			}
	}

on the FilterConditions.Add, instead of Equals use StartsWith
lastly, I provided a button or something to clear all filters when desired. You can do whatever you want here but provide a mechanism for getting back to zero…

	private void btnClearAll_Click(object sender, System.EventArgs args)
	{
		// ** Place Event Handling Code Here **
		tpGrid.Rows.ColumnFilters.ClearAllFilters();
		strJobNum.Clear();
		strAssembly.Clear();
		strOperation.Clear();
	}

here’s a reference to grid filters (remember, most of this is out there, it’s not epicor proprietary)

HTH

2 Likes

Awesome, that gets me started in the right direction. I will get as far as I can with the resources you showed me. I may have some other questions since I am new to customizations and not a programmer, but this should get me a long way.

So I’m going to lay out the steps that I think I need for this.

Under Add Custom Module Level Variables Here, I need to define my variables right? So I need to 1. name my grid, 2. define the string for the job number,3. and name the text box that I am using.

	// Add Custom Module Level Variables Here **

string strJobNum;
EpiUltraGrid MyGrid;
EpiTextBox JobFilter;

So then under the initialize custom code line I need to tell the system what grid it is actually looking at using the EpiGuid.

So this:

myGrid = (Ice.Lib.Framework.EpiUltraGrid)csm.GetNativeControlReference("b3e2940f-c81e-4838-9d16-90eff26f2e04");

And then turn the filtering on by this command:

myGrid.DisplayLayout.Override.AllowRowFiltering = DefaultableBoolean.True;

However when I test the code I get this error:

Error: CS0103 - line 36 (229) - The name ‘DefaultableBoolean’ does not exist in the current context

So I googled that command and found out that it belongs to Infragistics.Win namespace, so I added that in the using and that error went away

using Infragistics.Win;

I also added Infragistics.Win.UltraWinGrid for the FilterComparisionOperator command to be found.

Then I added the clear filter command in the else part of the on leave event so it someone removes everything it clears the filter.

MyGrid.Rows.ColumnFilters["JobNum"].FilterConditions.Clear()

It works really well, just type in what you want and hit tab (just like everywhere else in E-10) and it filters it.

If anyone is interested, Below is the full code so you can see it in context. If someone see something in there that will cause me a problem, I would be very appreciative of the heads up.

One last problem that I have to fix is, I had to move the grid to make room for the text box. When I did that, it seemed to have lost it’s anchors so the size of the grid is now very tall and wide, so it covers the buttons below and goes off of the edge of the screen to the right. How can I control that grid so that the edges stay where they should in relation to the size of the screen? I’ve played with the anchor part of the layout, but it doesn’t seem to change anything.

// **************************************************
// Custom code for WorkQueueForm
// Created: 5/23/2016 11:46:30 AM
// **************************************************
using System;
using System.ComponentModel;
using System.Data;
using System.Diagnostics;
using System.Windows.Forms;
using Erp.UI;
using Ice.Lib.Customization;
using Ice.Lib.ExtendedProps;
using Ice.Lib.Framework;
using Ice.Lib.Searches;
using Ice.UI.FormFunctions;
using Infragistics.Win;
using Infragistics.Win.UltraWinGrid;

public class Script
{
	// ** Wizard Insert Location - Do Not Remove 'Begin/End Wizard Added Module Level Variables' Comments! **
	// Begin Wizard Added Module Level Variables **

	// End Wizard Added Module Level Variables **

	// Add Custom Module Level Variables Here **

string strJob;
EpiUltraGrid MyGrid;
EpiTextBox JobFilter;

	public void InitializeCustomCode()
	{
		// ** Wizard Insert Location - Do not delete 'Begin/End Wizard Added Variable Initialization' lines **
		// Begin Wizard Added Variable Initialization

MyGrid = (Ice.Lib.Framework.EpiUltraGrid)csm.GetNativeControlReference("b3e2940f-c81e-4838-9d16-90eff26f2e04");
    MyGrid.DisplayLayout.Override.AllowRowFiltering = DefaultableBoolean.True;

JobFilter = (Ice.Lib.Framework.EpiTextBox)csm.GetNativeControlReference("656e3909-9ed0-43b1-8b26-2f779051b6d0");

		// End Wizard Added Variable Initialization

		// Begin Wizard Added Custom Method Calls

		this.JobFilterTextBox.Leave += new System.EventHandler(this.JobFilterTextBox_Leave);
		// End Wizard Added Custom Method Calls
	}

	public void DestroyCustomCode()
	{
		// ** Wizard Insert Location - Do not delete 'Begin/End Wizard Added Object Disposal' lines **
		// Begin Wizard Added Object Disposal

		this.JobFilterTextBox.Leave -= new System.EventHandler(this.JobFilterTextBox_Leave);
		// End Wizard Added Object Disposal

		// Begin Custom Code Disposal

		// End Custom Code Disposal
	}

	private void JobFilterTextBox_Leave(object sender, System.EventArgs args)
	{
			// ** Argument Properties and Uses **
			// args.Row["FieldName"]
			// args.Column, args.ProposedValue, args.Row
			// Add Event Handler Code
			if (JobFilter.Text != "")
				{
					MyGrid.Rows.ColumnFilters["JobNum"].FilterConditions.Clear();
					string strJob = JobFilter.Value.ToString();
					MyGrid.Rows.ColumnFilters["JobNum"].FilterConditions.Add( FilterComparisionOperator.StartsWith, strJob );
				}
			else
				{ 
					MyGrid.Rows.ColumnFilters["JobNum"].FilterConditions.Clear();
				}
	}
}
3 Likes

good job, yeah I forgot about the infragistics usings statement, but look at you all googly n stuff :slight_smile:

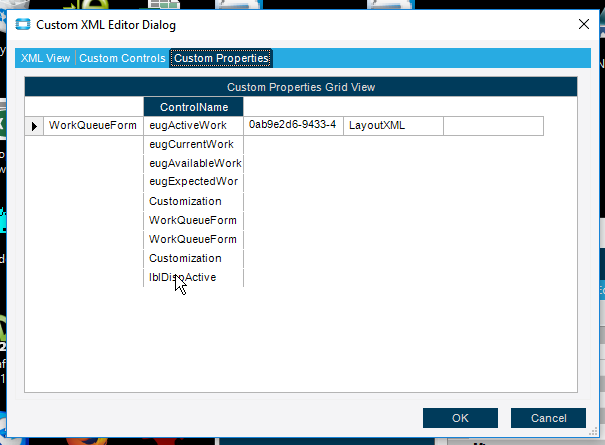
The grid variable should be global but as a rule if it doesn’t need to be global and public, jam it in the function it’s used in. MES can be a royal pain , once you get it aligned up how you want it, save, then in custom tools dialog under Tools custom XML editor go to the Properties tab and group by name, delete everything that is related to anchor except the base anchor (I circled below as an example) then save again. See how that works for you…

That didn’t work. Maybe I should be looking for everything relating to the Current Work Panel?

maybe i’ll have time to look at some of my old ones tomorrow, i know i’ve moved it around (and fought with it) successfully. So it’s doable.

So I’ve been playing with the XML editor. The best that I can get it to work is to delete the Base Anchor for the Current Work tab, and then it comes back as anchored top left and won’t resized with the window with with overall screen, but it doesn’t change the size arbitrarily to extremely large so it’s an improvement. At least it’s usable this way, but I would really like to figure out how to get it to work correctly though.

Side note, the custom XML editor is extremely buggy for me. Is that what everyone else is experiencing? Things show up as I put my mouse over them, then disappear again, I can kind of get the group by to work, but the same thing with stuff showing up, and not showing up. It makes it pretty tough to work with. See the screen shot below to see what it looks like (a video would be better, but you get the point)

just curious, what’s your specific version? It’s always worked well for me, but maybe that’s dumb luck.

10.0.700.4. We are working on the upgrade to 10.1.600 probably to start testing shortly after insights.

I just checked in the main program and it works fine. It’s just the MES developer where it does that.

So I pulled the work queue screen into a menu item on in the main program. It looks like I could work on the customization through there rather than logging to the developer mode in the MES. However the XML custom editor still has the buggy behavior. So it seems to be tied to something specifically with that screen? I’ll poke around the other MES screens and see if it happens with them too.

I looks like it’s just the work queue scree is doing it. Other MES screens it work without a problem

1 Like

So for anyone interested in how I fixed the grid anchoring issue, I added this code using the event wizard for load. Then I adjusted the sizing to the screen to match what I needed when the screen opened. It seems to stay anchored in the right place after that. I’m not sure why it works, but it did. (and this problem still happens in 10.1.600.5, I thought they had fixed this, but they didn’t).

	private void WorkQueueForm_Load(object sender, EventArgs args)
	{
		// Add Event Handler Code
ActiveWorkGrid.Anchor = (AnchorStyles.Top | AnchorStyles.Left | AnchorStyles.Bottom | AnchorStyles.Right);

	}

Now I could use a little more help on the anchoring issues. One of my users has a personalization enabled that makes his window bigger upon opening. No big deal, but the sizing of the grid is loading the original size for the smaller window. Now with the anchoring enabled from the code above, it anchors the extra space and resizes with the window.

I’ll keep googling, but I’m having a bit of trouble trying to figure out how to set the initial size of the grid based off of the main window size, which may be different depending on the personalization. My thought is to set the grid size/location based on the window, then set the anchoring using the above code so it will show up pretty much like the as built grids already do.

Thoughts?

There are probably fancy ways to do it but I tend to make grid width = form
or panel width when applicable.

If your grid is on a panel and the panel is autosize, it’s works pretty
well. You would set an event on form/panel resize to adjust grid as needed

I’ll give that a shot. Can I do width or height minus an amount? That way I can make room for buttons or other controls?

Yep, that’s very common. Even better make a variable called paddingh and paddingw, assign values at form_load and use those then if you ever want to change, no code changes needed, only values

Just in case someone wants to dynamically Filter a Combo

	private void MyCombo_GetOperations()
	{
		// Wizard Generated Search Method
		// You will need to call this method from another method in custom code
		// For example, [Form]_Load or [Button]_Click

		bool recSelected;
		string whereClause = string.Empty;
		System.Data.DataSet dsResourceAdapter = Ice.UI.FormFunctions.SearchFunctions.listLookup(this.oTrans, "ResourceAdapter", out recSelected, false, whereClause);
		if (recSelected)
		{
			// Set EpiUltraCombo Properties
			this.comboTCRelatedOp.ValueMember = "ResourceID";
			this.comboTCRelatedOp.DataSource = dsResourceAdapter;
			this.comboTCRelatedOp.DisplayMember = "ResourceGrpDescription";
			string[] fields = new string[] {"ResourceGrpDescription", "ResourceID"};
			this.comboTCRelatedOp.SetColumnFilter(fields);

			// Custom Values Filtering
	        UltraGridBand rootBand = this.comboTCRelatedOp.DisplayLayout.Bands[0];
	        //rootBand.Columns["ResourceID"].Hidden = true; // Make 2nd column invisible
	        rootBand.ColumnFilters.ClearAllFilters();
	        // TODO: Refactor
	        rootBand.ColumnFilters["ResourceGrpDescription"].FilterConditions.Add(FilterComparisionOperator.Contains, "RES1");
	        rootBand.ColumnFilters["ResourceGrpDescription"].FilterConditions.Add(FilterComparisionOperator.Contains, "Machine2");
	        rootBand.ColumnFilters["ResourceGrpDescription"].FilterConditions.Add(FilterComparisionOperator.Contains, "Test5");
	        rootBand.ColumnFilters["ResourceGrpDescription"].LogicalOperator = FilterLogicalOperator.Or;
		}
	}

	private void MyCombo_FilterTools(string[] showOnlyValues)
	{
		// Load Do Not Disable List Data
		List<string> vList = new List<string>(showOnlyValues);

		// Custom Values Filtering
        UltraGridBand rootBand = this.comboTCToolType.DisplayLayout.Bands[0];
        rootBand.ColumnFilters.ClearAllFilters();

        foreach (string v in vList)
        {
        	if (v != "") {
        		rootBand.ColumnFilters[0].FilterConditions.Add(FilterComparisionOperator.Contains, v);
        	}
        }

        rootBand.ColumnFilters[0].LogicalOperator = FilterLogicalOperator.Or;
	}

	private void MyCombo_FilterTools()
	{
		MyCombo_FilterTools(new string[] {""});
	}


	// You can then re-filter the Combo Via
	MyCombo_FilterTools(new string[] { "Steel", "Fixture" });
1 Like