Looking for advice on how you would go about tackling what I describe below please…
UD39 will be populated with data surrounding Lab Samples (we produce dairy product, sample pots take at various points and given a unique sample ID)
I have an updateable dashboard where the Lab team can tick the samples they are sending to external lab for analysis, and then press button to create CSV with required info
External lab will test, and send data back in CSV format.
I want to build a screen (either on UD39 customisation, or perhaps customisation layer on deployed dashboard whichever people anybody suggests is best) that allows specifying the CSV file location, then it will attempt to lookup the related row in Ice.UD39 based upon UD39.SampleID and the SampleID column from CSV.
a. If it find a row, it should update the UD fields on that row with the data from the CSV
b. If it fails for any reason, be able to show this somehow - another data grid on the screen, bound to a failure table? Creation of another CSV with failed records like DMT does?
c. Allow for subsequent updates - we can have results that are initial, and then get updated the next day within another CSV file. I can use change logging to store these changes I guess.
So methodology - do I read the CSV file into a datatable, and then work from that? Do I read line by line from the CSV and act upon each one in turn as I loop over the rows? Do I need to do anything with threading etc?
Hmmm. Either way works, starting from the updatable dashboard or the UD form.
Personally, I think I’d work on UD form for the blank slate. You can easily recreate the dashboard view (baqDataView).
Exporting the CSV would be str8 forward - loop thru the baqDataView (filter as needed) and export the line to CSV (obviously you can have a config tab, settings, csv location, etc)
I think for the import I’d create a class to match your needs:
public class MyRecord
{
string AField;
decimal AField
}
Then as you are processing the csv 1 line at a time, you can be creating these MyRecord objects and validating data.
You can keep the records in a list and update UD later: List<MyRecord> Good;
Or you can just process it on the fly.
You can store the entire line of failed records:
List<String[]> FailedLines;
Once you made it thru the entire file -
Attempt to update UD records from your objects (if you havent already)
save out (or log) the failures to a failedRecords.txt or similar
Regarding threading - I’d test worst case scenarios. If it will take more than a few seconds to process, a thread (with progress indicator) is nice.
So in the end I dont guess I answered any of your questions since it’s all dependent on your exact needs - there are pluses and minuses for each - you kind of have to try to visualize it all as a whole to see where you might benefit (or pay) for using a certain method.
If you have Service Connect, this is a pretty straightforward process with a workflow. You loop through each CSV record, see if the UD39 record already exists, then have a condition block that executes different code whether the record exists or not.
The tricky part may be outputting ONE csv file with all your “error” records. If you create the output in the subworkflow, it would create a separate CSV for each record. There may be a few tricks to get around that, or you could always write a quick windows script that concatenates the multiple CSV’s into one.
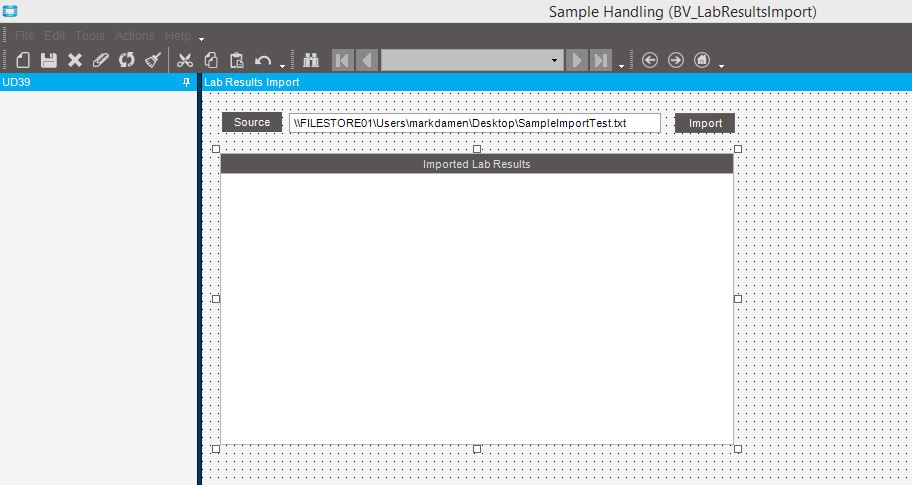
Hey Chris. Thanks for the amazing input earlier - started playing with it, and decided to go for customisation layer on UD39 form.
So far I’ve got:
A new class called Sample
A button called Source which calls the OpenFileDialog
An Import button which currently reads the data from the file selected, populates each row into an instance of Sample, then displays the data in MessageBox
Next questions - I’ve chucked an EpiUltraGrid onto the panel. What is the preferred way of populating it with data? Create an EpiDataView that’s bound to it and then mess with it’s data, create a table and bind it to it? Just want to know best practise.
Also, the empty panel on the left where the Tree view would normally be - can we get shot of that?
I don’t have Service Connect - could do an automated import in the same way using SSIS I guess, I’ve done that for other requirements. I’m using this as a learning experience, getting data in from a file and binding to grid on the UI. I also think that the department using this screen will want me to show the results that have failed against our internal standards in real-time - so using the UI to do the import and check results will probably be favourable.
Thanks for the suggestion though, good to hear all thoughts.
The easiest way to get rid of that panel is to do some unpinning, save the layout, open the customization (move something) then save. It doesnt go away, it just hides on the side of the screen. I am sure we could use some reflection and get rid of it altogether.
Ask @josecgomez - EpiDataView, EpiDataView,EpiDataView,EpiDataView. Lol - he loves the EpiMagic.
Create a table based on your object type’s fields.
Create an edv, set the dataView = Table.DefaultView, add the edv to oTrans
Save customization and reopen - now you can bind it to the grid.